
No products
Prices are tax included
Product successfully added to your shopping cart
There are 0 items in your cart. There is 1 item in your cart.


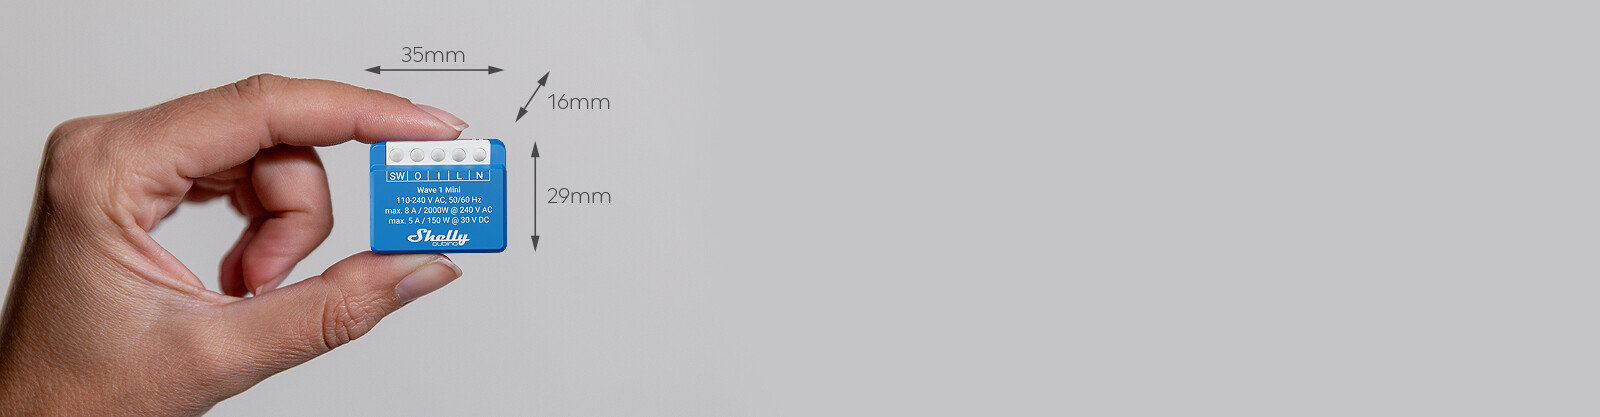
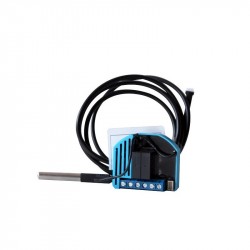
Shelly Qubino Wave 1 Mini - Module relay 1 dry contact 8A
QMSW-0A1X8EU
New
The smallest Z-Wave smart switch in the world for smart control. Automate and remotely control a wide range of small electrical appliances, such as locks, garage doors, irrigation systems, and lights. Due to its compact design, Wave 1 Mini is a perfect fit for even the smallest switch boxes and/or appliances
In Stock
- Remove this product from my favorite's list.
- Add this product to my list of favorites.

Technical characteristics
| Technology | Z-Wave Serie 800 |
More info
Z-Wave® smart switch, 1 channel 8 A with dry contacts
The smallest Z-Wave smart switch in the world for smart control. Automate and remotely control a wide range of small electrical appliances, such as locks, garage doors, irrigation systems, and lights. Due to its compact design, Wave 1 Mini is a perfect fit for even the smallest switch boxes and/or appliances.
- Supports up to 8 A at 240 V AC and 5 A at 30 V DC
- Dry contacts (potential-free)
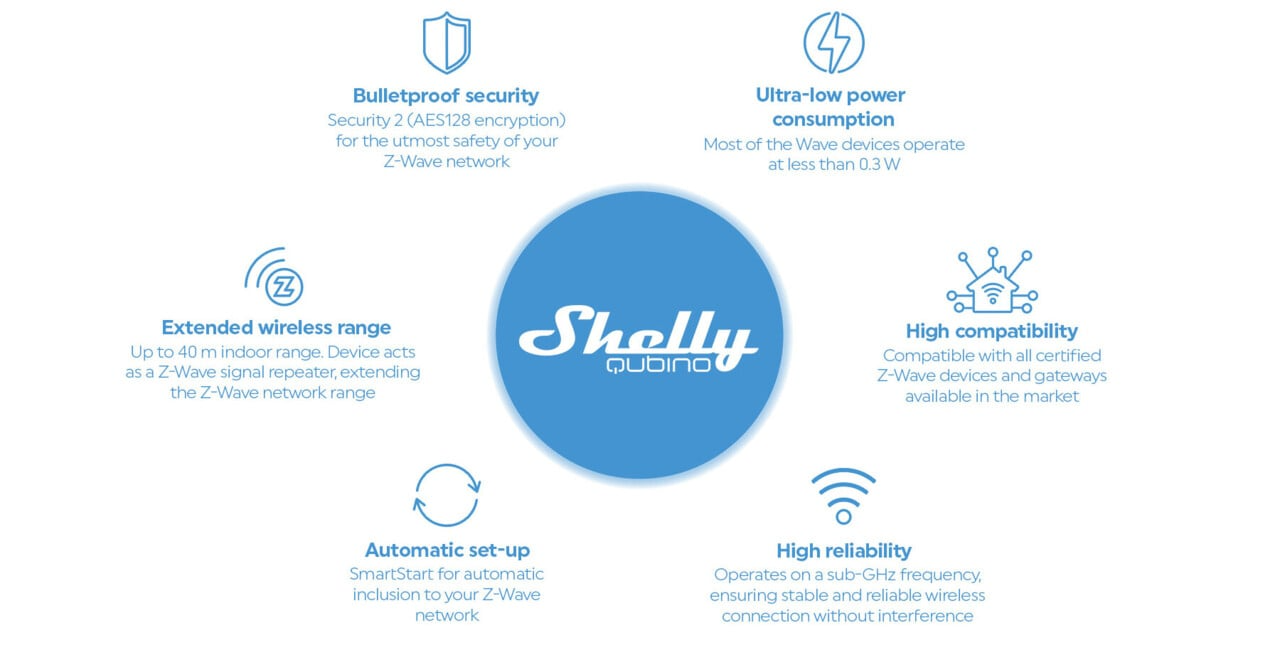
- Extremely low power consumption: < 0.3 W
- Z-Wave frequency band: 868.4 MHz (CEPT countries)
- Latest technology: Z-Wave 800 Series
- Automatic set-up with SmartStart
- Security 2 Authenticated for the highest level of security
- Supports over-the-air firmware updates
- Fast and simple installation in most electrical boxes and switches
- Works with Z-Wave certified gateways and over 4,000 Z-Wave devices
Extended Z-Wave info
The first five digits of the key are highlighted or underlined to help the user identify the PIN Code part of the DSK text. The DSK is additionally represented with a QR Code as shown on the image.
Note! All Device outputs (O, O1, O2, etc. - depending on the Device type) will turn the load 1s on/1s off /1s on/1s off if the Device is successfully added to/removed from a Z-Wave® network.
Note! In case of Security 2 (S2) adding (inclusion), a dialog will appear asking you to enter the corresponding PIN Code (5 underlined digits) that are written on the Z-Wave® DSK label on the side of the Device and on the Z-Wave® DSK label inserted in the packaging.
IMPORTANT: The PIN Code must not be lost.
7.1.1. SmartStart adding (inclusion)
SmartStart enabled products can be added into a Z-Wave® network by scanning the Z-Wave® QR Code present on the Device with a gateway providing SmartStart inclusion. No further action is required, and the SmartStart device will be added automatically within 10 minutes of being switched on in the network vicinity.
1. With the gateway application scan the QR code on the Device label and add the Security 2 (S2) Device Specific Key (DSK) to the provisioning list in the gateway.
2. Connect the Device to a power supply.
3. Check if the blue LED is blinking in Mode 1. If so, the Device is not added to a Z-Wave® network.
4. Adding will be initiated automatically within a few seconds after connecting the Device to a power supply, and the Device will be added to a Z-Wave® network automatically.
5. The blue LED will be blinking in Mode 2 during the adding process.
6. The green LED will be blinking in Mode 1 if the Device is successfully added to a Z-Wave® network.
7.1.2. Adding (inclusion) with the S button
1. Connect the Device to a power supply.
2. Check if the blue LED is blinking in Mode 1. If so, the Device is not added to a Z-Wave® network.
3. Enable add/remove mode on the gateway.
4. To enter the Setting mode, quickly press and hold the S button on the Device until the LED turns solid blue.
5. Quickly release and then press and hold (> 2s) the S button on the Device until the blue LED starts blinking in Mode 3. Releasing the S button will start the Learn mode.
6. The blue LED will be blinking in Mode 2 during the adding process.
7. The green LED will be blinking in Mode 1 if the Device is successfully added to a Z-Wave® network.
Note! In Setting mode, the Device has a timeout of 10s before entering again into Normal mode.
7.1.3. Adding (inclusion) with a switch/push-button
1. Connect the Device to a power supply.
2. Check if the blue LED is blinking in Mode 1. If so, the Device is not added to a Z-Wave® network.
3. Enable add/remove mode on the gateway.
4. Toggle the switch/push-button connected to any of the SW terminals (SW, SW1, SW2, etc.) 3 times within 3 seconds (this procedure puts the Device in Learn mode*). The Device must receive on/off signal 3 times, which means pressing the momentary switch 3 times, or toggling the switch on and off 3 times.
5. The blue LED will be blinking in Mode 2 during the adding process.
6. The green LED will be blinking in Mode 1 if the Device is successfully added to a Z-Wave® network.
*Learn mode - a state that allows the Device to receive network information from the gateway.
Note! The Device will be removed from your Z-Wave® network, but any custom configuration parameters will not be erased.
Note! All Device outputs (O, O1, O2, etc. - depending on the Device type) will turn the load 1s on/1s off /1s on/1s off if the Device is successfully added to/removed from a Z-Wave® network.
7.2.1. Removing (exclusion) with the S button
1. Connect the Device to a power supply.
2. Check if the green LED is blinking in Mode 1. If so, the Device is added to a Z-Wave® network.
3. Enable add/remove mode on the gateway.
4. To enter the Setting mode, quickly press and hold the S button on the Device until the LED turns solid blue.
5. Quickly release and then press and hold (> 2s) the S button on the Device until the blue LED starts blinking in Mode 3. Releasing the S button will start the Learn mode.
6. The blue LED will be blinking in Mode 2 during the removing process.
7. The blue LED will be blinking in Mode 1 if the Device is successfully removed from a Z-Wave® network.
Note! In Setting mode, the Device has a timeout of 10s before entering again into Normal mode.
7.2.2. Removing (exclusion) with a switch/push-button
1. Connect the Device to a power supply.
2. Check if the green LED is blinking in Mode 1. If so, the Device is added to a Z-Wave® network.
3. Enable add/remove mode on the gateway.
4. Toggle the switch/push-button connected to any of the SW terminals (SW, SW1, SW2,…) 3 times within 3 seconds (this procedure puts the Device in Learn mode). The Device must receive on/off signal 3 times, which means pressing the momentary switch 3 times, or toggling the switch on and off 3 times.
5. The blue LED will be blinking in Mode 2 during the removing process.
6. The blue LED will be blinking in Mode 1 if the Device is successfully removed from a Z-Wave® network.
7.3.1. Factory reset general
After Factory reset, all custom parameters and stored values (kWh, associations, routings, etc.) will return to their default state. HOME ID and NODE ID assigned to the Device will be deleted. Use this reset procedure only when the gateway is missing or otherwise inoperable.
7.3.2. Factory reset with the S button
Note! Factory reset with the S button is possible anytime.
1. To enter the Setting mode, quickly press and hold the S button on the Device until the LED turns solid blue.
2. Press the S button multiple times until the LED turns solid red.
3. Press and hold (> 2s) S button on the Device until the red LED starts blinking in Mode 3. Releasing the S button will start the factory reset.
4. During factory reset, the LED will turn solid green for about 1s, then the blue and red LED will start blinking in Mode 3 for approx. 2s.
5. The blue LED will be blinking in Mode 1 if the Factory reset is successful.
7.3.3. Factory reset with a switch/push-button
Note! Factory reset with a switch/push-button is only possible within the first minute after the Device is connected to a power supply.
1. Connect the Device to a power supply.
2. Toggle the switch/push-button connected to any of the SW terminals (SW, SW1, SW2,…) 5 times within 3 seconds. The Device must receive on/off signal 5 times, which means pressing the push-button 5 times, or toggling the switch on and off 5 times.
3. During factory reset, the LED will turn solid green for about 1s, then the blue and red LED will start blinking in Mode 3 for approx. 2s.
4. The blue LED will be blinking in Mode 1 if the Factory reset is successful.
Reviews
30 other products in the same category:
-
Bypass for...
-
Qubino...
-
Qubino...
-
Philio...
-
AEOTEC -...
-
AEOTEC -...
-
Aeotec...
-
Aeotec Nano...
-

Aeotec Nano...
-
Qubino Mini...
-

WiDom Smart...
-
WiDom Smart...
-
WiDom Smart...
-

Qubino...
-
Fibaro...
-
Micromodule...
-
FIBARO RGBW...
-

FIBARO...
-
HELTUN -...
-
HELTUN -...
-
Heatit ZM...
-
Philio...
-
ZOOZ...
-
Philio...
-
Philio...
-
Z-Wave to...
-
Heatit ZM...
-
Heatit ZM...
-
Shelly...
-
Shelly...