No products
Prices are tax included
Product successfully added to your shopping cart
There are 0 items in your cart. There is 1 item in your cart.


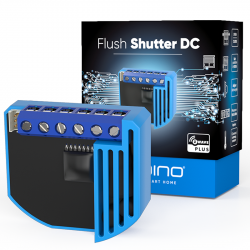
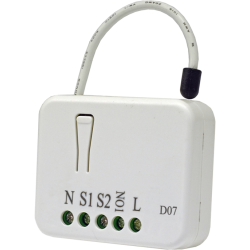
Qubino Mini Dimmer - Z-Wave + regulator micromodule
ZMNHHD1
New
This Mini Dimmer is 25% smaller than other wireless micromodules on the market. Thanks to its small size, it allows quick and easy installation.
In Stock
- Remove this product from my favorite's list.
- Add this product to my list of favorites.

Technical characteristics
| Technology | Z-Wave Plus |
| Characteristic | Dimmer |
More info
Mini Dimmer Qubino
The Qubino Mini Dimmer is 25% smaller than other similar wireless devices on the market. Thanks to its small size, it allows quick and easy installation. The wireless signal works with the Z-Wave protocol.
It works without neutral wire
The mini-regulator does not require a neutral cable (N). It works in a 2-wire configuration.
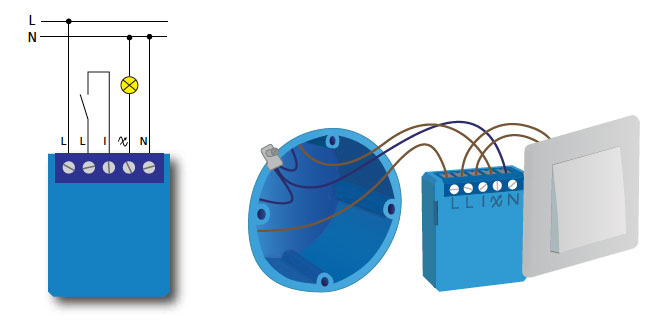
Installation of the Mini Dimmer Qubino with 2 wires ( without neutral)
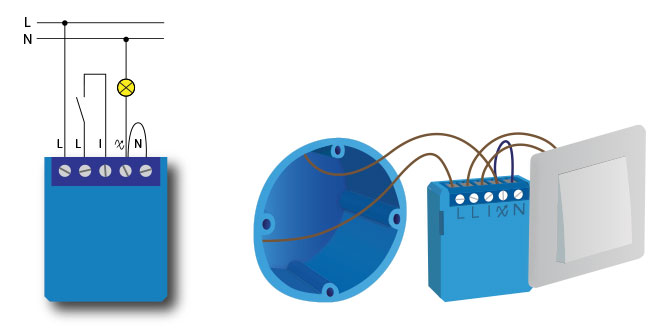
Installation of the Mini Dimmer Qubino with 3 wires ( with neutral)
Light bulbs from 1W
Connect and control energy saving light bulbs remotely. A minimum load is not required.
Quick and easy installation
Due to its small size, it is suitable even for the smallest, most superficial and overflow electrical boxes and cable overflows.
Vary all types of light bulbs of varying intensity
The Qubino Mini Dimmer will be calibrated to work with your specific type of bulb - from LEDs, fluorescent, halogen to incandescent. Regardless of the type of bulb you use, the Mini Dimmer offers you a maximum regulation range.
|
It is suitable for all types of built-in boxes worldwide
Reduce assembly time and installation costs. Install it quickly and easily behind a conventional switch.
LED signaling
Easily recognize if the Mini Dimmer is included or excluded from the network, be informed in case of overload or overheating as well as when the calibration is in progress.
FUNCTIONS:
The Qubino Mini Dimmer is the smallest wireless dimmer in the world.
It can be installed in a 2-wire system, without the need for a neutral wire.
Of course, it can also be installed in a 3-wire system - with neutral wire
Due to its small size, it is suitable even for the smallest, most superficial and most messy electrical cabinets.
It is suitable for all types of built-in boxes worldwide.
You can remotely connect and control the bulbs from 1W, without requiring a minimum load.
It can regulate all types of variable intensity bulbs - incandescent, halogen, LED, LED light strips, fluorescent
It has LED signaling to easily recognize if the Mini Dimmer is included or excluded from the network, in case of overload or overheating and when the calibration is in progress.
Extremely low power consumption: less than 0.4 W
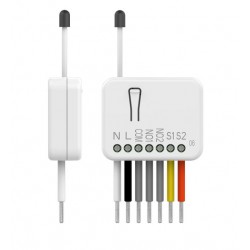
TECHNICAL SPECIFICATIONS
Power supply: 110 - 240 VAC 50Hz
Nominal output load current: 0.85A
Output power of the output circuit (resistive load): 200W
Accuracy of consumption measurement (2 wires): ± 10%.
Accuracy of consumption measurement (3 wires): ± 2%.
Operating temperature: -10 to +40 ° C
Distance: up to 30 m inside
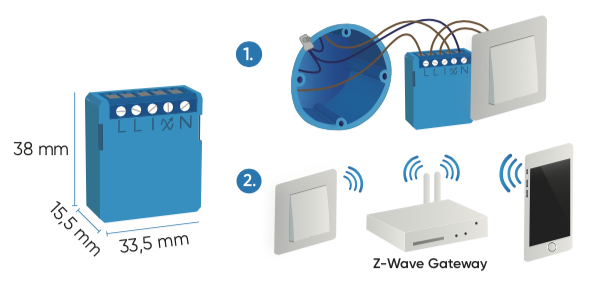
Dimensions (width x height x depth): 38mm x 33.5mm x 15.5mm
Weight: 28 g
Power Consumption: 0.4 W
For installation in boxes: Ø e 60 mm or 2M
Switching: MOSFET (phase cut / leakage edge)
Z-Wave Repeater: Yes
![]()
Extended Z-Wave info
Manual download HERE.
1. Connect the device to the power supply.
2. Within the first minute (60 seconds) the device is connected to the power supply, toggle the switch connected to the terminal I 5 times within 3 seconds. The device has to get On/Off signal 5 times, meaning 5 times push of the momentary switch or with toggle switch 5 times On and 5 times Off.
OR
Press and hold the S (Service) button for at least 6 seconds if connected to power supply. For your safety use only 24-30 Vdc power supply when accessing to S (Service) button. This procedure put the device in LEARN MODE.
ⓘ NOTE: By resetting the device, all custom parameters previously set on the device will return to their default values, and the node ID will be deleted. Use this reset procedure only when the main gateway (hub) is missing or otherwise inoperable. If an end device is factory reset, it is reverted to the Z-Wave SmartStart inclusion state.
ⓘ NOTE: the reset with switch connected to terminal I is possible only in the first minute after the device is connected to the power.
ⓘ NOTE: after the reset is successfully done the autocalibration will trigger and the green LED will start blinking.
1. Scan QR code on device label and add S2 DSK to Provisioning List in gateway (hub)
2. Connect the device to the power supply
3. Inclusion will be initiated automatically within few seconds of connection to the power supply and the device will automatically enrol in your network (when the device is excluded and connected to the power supply it automatically enters the LEARN MODE state).
NOTE: LEARN MODE state allows the device to receive network information from the controller.
ⓘ SmartStart inclusion is a part of S2 security level, so if you want to use SmartStart, you need to include it as S2 Authenticated.
1. Connect the device to the power supply.
2. Make sure the device is within direct range of your Z-Wave gateway (hub) or use a hand-held Z-Wave remote to perform exclusion.
3. Enable add/remove mode on your Z-Wave gateway (hub).
4. Toggle the switch connected to the terminal I 3 times within 3 seconds (this procedure put the device in LEARN MODE). The device has to get On/Off signal 3 times, meaning 3 times push of the momentary switch or with toggle switch 3 times On and 3 times Off.
OR
Press and hold the S (Service) button between 2 and 6 seconds if connected power supply. For your safety use only 24-30 Vdc power supply when accessing to S (Service) button. This procedure put the device in LEARN MODE.
5. Exclusion with the switch connected to terminal I is not limited by time.
6. The device will be removed from your network, but any custom configuration parameters will not be erased.
ⓘ NOTE: LEARN MODE state allows the device to receive network information from the controller.
Reviews
Funciona: dimmer sin neutro
Muy útil cuando hay que ponerlo en caja de mecanismos
Es MUY pequeño
Muy pequeñín. Cabe donde haga falta. Funciona bien y rapido sin latencias. Comprare mas.
Recomendable 100x100
Muy recomendable. Es muy pequeño. Formidable que no requiera neutro obligatorio para funcionar. Me ha sacado de un apuro. Me llego rapido. Gracias.
Muy pequeño
Este dimmer es muy pequeño. Funciona bien con eedomus dimando bombillas del Ikea
30 other products in the same category:
-
Bypass for...
-
Qubino...
-
Qubino...
-
Philio...
-
AEOTEC -...
-
AEOTEC -...
-
Aeotec...
-
Aeotec Nano...
-

Aeotec Nano...
-

WiDom Smart...
-
WiDom Smart...
-
WiDom Smart...
-

Qubino...
-
Fibaro...
-
Micromodule...
-
FIBARO RGBW...
-
FIBARO...
-
HELTUN -...
-
HELTUN -...
-
Heatit ZM...
-
Philio...
-
Philio...
-
Philio...
-
Z-Wave to...
-
Heatit ZM...
-
Heatit ZM...
-

Shelly...
-
Shelly...
-

Shelly...
-

Shelly...