No products
Prices are tax included
Product successfully added to your shopping cart
There are 0 items in your cart. There is 1 item in your cart.


 View larger


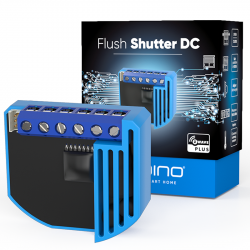
FIBARO Roller Shutter 3
FGR-223
New
The Fibaro Roller Shutter 3 FGR-223 will allow you to manage shutter actuators with electronic and mechanical stops, venetian blinds or even garage doors
In Stock
- Remove this product from my favorite's list.
- Add this product to my list of favorites.

Technical characteristics
| Technology | Z-Wave Plus |
More info
Roller Shutter 3
FIBARO Roller Shutter 3 is a new version of the radio-controller based on Z-Wave 5 technology. It works with motorized roller blinds, venetian blinds, awnings and gates. The Roller Shutter 3 is powered by a single-phase AC and provides precise positioning of blinds, awnings or gates so they can be set to the position you choose. The module is also equipped with a power metering feature when used with a FIBARO Home Center.
Proven design, sophisticated technology and still better - the new Roller Shutter 3!
The FIBARO Roller Shutter 3 features the Z-Wave Chip GEN5 and is Z-Wave Plus certified. As usual, you integrate your roller shutters, awnings, electric blinds and garage doors into the Z-Wave network.
Thanks to Roller Shutter 3 any device that is powered by an AC electric motor can be remote controlled. The shutter control module allows precise positioning of motors with mechanical and electrical end switch. Furthermore, the device allows current monitoring.
Due to the control with conventional switch, per app or with preconfigured scenes you can make your life more comfortable. Even if you are already lying in bed, close your blinds comfortably without having to get up. The Roller Shutter 3 also contributes to safety. When you leave the house, you close all windows and shutters simply by pressing a single button.
The compact radio module is placed in a wall box right behind the normal switch. The switch is no longer directly connected to the load but acts as input device for the FIBARO insert that is controlling the load. The switch only sends control signal to the insert which controls the load then again. The solution works with all switch design. It’s recommended to use wall boxes with 65mm depth. But smaller boxes with only 45mm depth can be used also if there is enough space behind the switch. The available space depends on the size of the traditional switch, the dimensions of the wall box and the amount of additional cabling placed in this box.
Features:
- Flush-mounted radio modul for integration existing installations (shutters, awnings, garage doors...) into a Z-Wave network
- Precice motor positioning
- Maximum load: 4.2A (resistive), 1.7A (inductive)
- Energy measurement function
- Works with momentary or toggle switches or by dedicated roller blind control switches
- Allows scene activation by physical switch
- Power supply: 110 - 240VAC, 50/60Hz
- Wiring: Requires neutral
- Power Consumption: < 0.8W
- Wireless technology: Z-Wave Plus
| Article Dimensions (WxHxL) | 42 x 37 x 16 mm |
| Z-Wave Plus | yes |
| Z-Wave S2 | yes |
| WEEE | yes |
Extended Z-Wave info
Manual download HERE.
1. Make sure the device is powered.
2. Identify the S1 switch.
3. Set the main controller in remove mode (see the controller’s manual).
4. Quickly, triple click the S1 switch.
5. Wait for the removing process to end.
6. Successful removing will be confirmed by the Z-Wave controller’s message.
1. Power the device.
2. Identify the S1 switch.
3. Set the main controller in (Security/non-Security Mode) add mode (see the controller’s manual).
4. Quickly, triple click the S1 switch.
5. If you are adding in Security S2, scan the DSK QR code or input the underlined part of the DSK (label on the bottom of the box).
6. Wait for the adding process to end.
7. Successful adding will be confirmed by the Z-Wave controller’s message.
To add the device to the Z-Wave network using Smart Start:
1. Set the main controller in Security S2 Authenticated add mode (see the controller’s manual)
2. Scan the DSK QR code or input the underlined part of the DSK
3. (label on the bottom of the box).
4. Power the device (turn on the mains voltage).
5. LED will start blinking yellow, wait for the adding process to end.
6. Successful adding will be confirmed by the Z-Wave controller’s message.
1. Switch off the mains voltage (disable the fuse).
2. Remove the device from the wall switch box.
3. Switch on the mains voltage.
4. Press and hold the B-button to enter the menu.
5. Wait for the LED indicator to glow yellow.
6. Quickly release and click the B-button again.
7. After few seconds the device will be restarted, which is signalled with the red LED indicator colour.
Please use this procedure only when the network primary controller is missing or otherwise inoperable.""
Reviews
Domotizar persianas en Home Assistant
Llevo varios meses de uso en Home Assitant (ahora ya tengo 5 persianas) y estoy muy satisfecho con estos dispositivos de Fibaro. La respuesta es inmediata. Cierto es que la integración con HA tiene sus peculiaridades pero he conseguido tener un sistema estable y "barato"
Magnifico para domotizar persianas
Funcionan muy bien con Home Center 3 y Alexa
Funciona bien en eedomus
Se integra bien en eedomus. Me llego rapido y no tuve problemas. Gracias.