Ningún producto
Precios con IVA incluído
Producto añadido correctamente a su carrito de la compra
Hay 0 artículos en su carrito. Hay 1 artículo en su cesta.


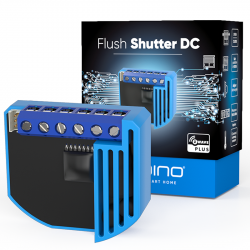
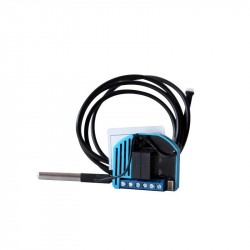
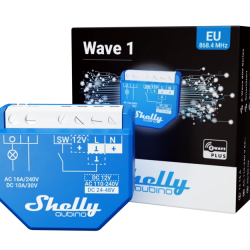
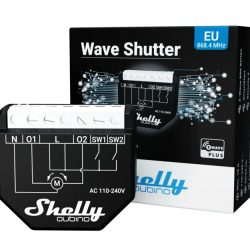
Shelly Qubino Wave 1PM - Micromódulo Relé 16A con medición de consumo
QNSW-001P16EU
Nuevo
Relé simple de tecnología inalámbrica Z-Wave válido para 110-240V AC máxima carga 16A en corriente alterna o 24-30V DC máxima carga 10A en corriente contínua. Shelly Qubino Wave 1PM es la nueva generación de interruptor de gran alcance para domótica Z-Wave con chip serie 800 en el interior.
Protección contra sobrecarga, tensión y temperatura
Rápido procesador ESP32
Z-Wave 800
En Stock - Envío inmediato
- Eliminar de mis favoritos
- Agregar este producto a mis favoritos
- Imprimir

Características técnicas
| Tecnología | Z-Wave Serie 800 |
Descripción
Micromódulo Interruptor inteligente Z-Wave™, 1 canal 16 A, con medición de potencia.
Controle y mida el consumo eléctrico de una amplia gama de electrodomésticos y equipos de oficina (luces, líneas eléctricas, sistemas de seguridad, calefactores, calentadores de agua, etc.) desde cualquier lugar.
Medición de potencia
Consumo de energía extremadamente bajo: 0.3 W.
Banda de frecuencia Z-Wave: 868,4 MHz (países CEPT)
Última tecnología: Chip Z-Wave Serie 800
Configuración automática con SmartStart
Seguridad 2 autenticada para el máximo nivel de seguridad
Admite actualizaciones de firmware por aire
Instalación sencilla en la mayoría de cajas eléctricas e interruptores estándar
Funciona con pasarelas certificadas Z-Wave y más de 4.000 dispositivos Z-Wave
* No se incluye una puerta de enlace (concentrador inteligente). Se requiere una pasarela (smart hub) para la configuración del dispositivo.
Wave 1PM es compatible hacia atrás en cuanto a tecnología Z-Wave y está diseñado para encajar detrás de cualquier interruptor o enchufe, transformándolo al instante en inteligente. Una vez instalado, inclúyalo en su red Z-Wave (se requiere pasarela Z-Wave) y controle los electrodomésticos conectados desde cualquier lugar utilizando su smartphone o tableta. Los dispositivos Shelly Qubino funcionan con más de 4000 dispositivos y pasarelas certificados por la Z-Wave Alliance.
Funciona con Z-Wave
Conecta Wave 1PM a tu red Z-Wave y contrólalo a distancia. Es compatible con todas las pasarelas Z-Wave certificadas.
Asociaciones
Establezca una comunicación directa entre los dispositivos de su red local Z-Wave y defina acciones personalizadas sin necesidad de un concentrador.
Control del consumo eléctrico
Wave 1PM proporciona una supervisión precisa del consumo de energía.
Amplia gama de voltajes
Horarios personalizados
Cree horarios personalizados alineados con su rutina diaria o sincronícelos con la salida/puesta del sol para gestionar su iluminación (requiere pasarela).
Escenas inteligentes
Configura escenas personalizadas combinando Wave 1PM con cualquier otro dispositivo Z-wave (requiere pasarela).
Un sinfín de aplicaciones de uso
Controle el sistema de su piscina a distancia
Automatice el sistema de su piscina y disfrute de agua fresca y limpia durante todo el verano. Shelly Wave 1PM le permite programar y supervisar fácilmente el funcionamiento de los equipos de la piscina. Establezca rutinas para hacer funcionar automáticamente la bomba de la piscina y el sistema de filtración, optimizando la circulación del agua y manteniendo su claridad. Programe el encendido automático de las luces de la piscina a medida que desaparece la luz del día y sumérjase en una experiencia más eficiente y agradable.
Automatice y controle sus electrodomésticos desde cualquier lugar
Automatice fácilmente y controle a distancia una amplia gama de electrodomésticos de su casa, como calentadores de agua, aparatos de calefacción, luces y muchos más. Imagine despertarse en un hogar acogedor en una mañana fría, ya que sus aparatos de calefacción se activan automáticamente incluso antes de que usted salga de la cama. También puede encender el calentador de agua a distancia para disponer de agua caliente después de un largo día. Disfrute de la comodidad, la eficiencia energética y el control personalizado que Shelly Wave 1PM aporta a su vida diaria.
Controle su consumo de energía y reduzca los costes de electricidad
Con la medición precisa de energía integrada de Wave 1PM, puede realizar un seguimiento y controlar el consumo de sus aparatos eléctricos, lo que simplifica el ahorro en sus facturas de electricidad. Optimice el consumo de energía sin renunciar al confort.
Maximice el confort de su hogar
con escenas inteligentes
Combine Wave 1PM con otros dispositivos y cree escenas personalizadas en función de la hora, la iluminación o diversos activadores. Apaga las luces, los dispositivos multimedia, bloquea las puertas y ajusta la calefacción, todo ello con un simple comando de voz o una pulsación en tu smartphone.
| Alimentacion | 110-240 V AC / 24–30 V DC |
|---|---|
| Power consumption | < 0.3 W |
| Power measurement (W) | Yes |
| Max switching voltage AC | 240 V |
| Max switching current AC | 16 A |
| Max switching voltage DC | 30 V |
| Max switching current DC | 10 A |
| Overheating protection | Yes |
| Overload protection | Yes |
| Distance | Up to 40 m indoors (131 ft.) (depends on local condition) |
| Z-Wave™ repeater: | Yes |
| CPU | Z-Wave™ S800 |
| Z-Wave™ frequency bands: | 868,4 MHz; 865,2 MHz; 869,0 MHz; 921,4 MHz; 908,4 MHz; 916 MHz; 919,8 MHz; 922,5 MHz; 919,7-921,7-923,7 MHz; 868,1 MHz; 920,9 MHz |
| Maximum radio frequency power transmitted in frequency band(s) | < 25 mW |
| Size (H x W x D) | 37x42x16 ±0.5 mm / 1.46x1.65x0.63 ±0.02 in |
| Weight | 27 g / 0.95 oz. |
| Mounting | Wall console |
| Screw terminals max. torque | 0.4 Nm / 3.5 lbin |
| Conductor cross section | 0.5 to 1.5 mm² / 20 to 16 AWG |
| Conductor stripped length | 5 to 6 mm / 0.20 to 0.24 in |
| Shell material | Plastic |
| Color | Red |
| Ambient temperature | -20°C to 40°C / -5°F to 105°F |
| Humidity | 30% to 70% RH |
| Max. altitude | 2000 m / 6562 ft. |
Información Ampliada Z-Wave (Inglés)
The first five digits of the key are highlighted or underlined to help the user identify the PIN Code part of the DSK text. The DSK is additionally represented with a QR Code as shown on the image.
Note! All Device outputs (O, O1, O2, etc. - depending on the Device type) will turn the load 1s on/1s off /1s on/1s off if the Device is successfully added to/removed from a Z-Wave™ network.
6.1.1 SmartStart adding (inclusion)
SmartStart enabled products can be added into a Z-Wave™ network by scanning the Z-Wave™ QR Code present on the Device with a gateway providing SmartStart inclusion. No further action is required, and the SmartStart device will be added automatically within 10 minutes of being switched on in the network vicinity.
1. With the gateway application scan the QR code on the Device label and add the Security 2 (S2) Device Specific Key (DSK) to the provisioning list in the gateway.
2. Connect the Device to a power supply.
3. Check if the blue LED is blinking in Mode 1. If so, the Device is not added to a Z-Wave™ network.
4. Adding will be initiated automatically within a few seconds after connecting the Device to a power supply, and the Device will be added to a Z-Wave™ network automatically.
5. The blue LED will be blinking in Mode 2 during the adding process.
6. The green LED will be blinking in Mode 1 if the Device is successfully added to a Z-Wave™ network.
6.1.2 Adding (inclusion) with a switch/push-button
1. Connect the Device to a power supply.
2. Check if the blue LED is blinking in Mode 1. If so, the Device is not added to a Z-Wave™ network.
3. Enable add/remove mode on the gateway.
4. Toggle the switch/push-button connected to any of the SW terminals (SW, SW1, SW2, etc.) 3 times within 3 seconds (this procedure puts the Device in Learn mode*). The Device must receive on/off signal 3 times, which means pressing the momentary switch 3 times, or toggling the switch on and off 3 times.
5. The blue LED will be blinking in Mode 2 during the adding process.
6. The green LED will be blinking in Mode 1 if the Device is successfully added to a Z-Wave™ network.
*Learn mode - a state that allows the Device to receive network information from the gateway.
6.1.3 Adding (inclusion) with the S button
1. Connect the Device to a power supply.
2. Check if the blue LED is blinking in Mode 1. If so, the Device is not added to a Z-Wave™ network.
3. Enable add/remove mode on the gateway.
4. To enter the Setting mode, quickly press and hold the S button on the Device until the LED turns solid blue.
5. Quickly release and then press and hold (> 2s) the S button on the Device until the blue LED starts blinking in Mode 3. Releasing the S button will start the Learn mode.
6. The blue LED will be blinking in Mode 2 during the adding process.
7. The green LED will be blinking in Mode 1 if the Device is successfully added to a Z-Wave™ network.
Note! In Setting mode, the Device has a timeout of 10s before entering again into Normal mode.
Note! The Device will be removed from your Z-wave™ network, but any custom configuration parameters will not be erased.
Note! All Device outputs (O, O1, O2, etc. - depending on the Device type) will turn the load 1s on/1s off /1s on/1s off if the Device is successfully added to/removed from a Z-Wave™ network.
6.2.1 Removing (exclusion) with a switch/push-button
1. Connect the Device to a power supply.
2. Check if the green LED is blinking in Mode 1. If so, the Device is added to a Z-Wave™ network.
3. Enable add/remove mode on the gateway.
4. Toggle the switch/push-button connected to any of the SW terminals (SW, SW1, SW2,…) 3 times within 3 seconds (this procedure puts the Device in Learn mode). The Device must receive on/off signal 3 times, which means pressing the momentary switch 3 times, or toggling the switch on and off 3 times.
5. The blue LED will be blinking in Mode 2 during the removing process.
6. The blue LED will be blinking in Mode 1 if the Device is successfully removed from a Z-Wave™ network.
6.2.2 Removing (exclusion) with the S button
1. Connect the Device to a power supply.
2. Check if the green LED is blinking in Mode 1. If so, the Device is added to a Z-Wave™ network.
3. Enable add/remove mode on the gateway.
4. To enter the Setting mode, quickly press and hold the S button on the Device until the LED turns solid blue.
5. Quickly release and then press and hold (> 2s) the S button on the Device until the blue LED starts blinking in Mode 3. Releasing the S button will start the Learn mode.
6. The blue LED will be blinking in Mode 2 during the removing process.
7. The blue LED will be blinking in Mode 1 if the Device is successfully removed from a Z-Wave™ network.
Note! In Setting mode, the Device has a timeout of 10s before entering again into Normal mode.
6.3.1 Factory reset general
After Factory reset, all custom parameters and stored values (kWh, associations, routings, etc.) will return to their default state. HOME ID and NODE ID assigned to the Device will be deleted. Use this reset procedure only when the gateway is missing or otherwise inoperable.
6.3.2 Factory reset with a switch/push-button
Note! Factory reset with a switch/push-button is only possible within the first minute after the Device is connected to a power supply.
1. Connect the Device to a power supply.
2. Toggle the switch/push-button connected to any of the SW terminals (SW, SW1, SW2,…) 5 times within 3 seconds. The Device must receive on/off signal 5 times, which means pressing the push-button 5 times, or toggling the switch on and off 5 times.
3. During factory reset, the LED will turn solid green for about 1s, then the blue and red LED will start blinking in Mode 3 for approx. 2s.
4. The blue LED will be blinking in Mode 1 if the Factory reset is successful.
6.3.3 Factory reset with the S button
Note! Factory reset with the S button is possible anytime.
1. To enter the Setting mode, quickly press and hold the S button on the Device until the LED turns solid blue.
2. Press the S button multiple times until the LED turns solid red.
3. Press and hold (> 2s) S button on the Device until the red LED starts blinking in Mode 3. Releasing the S button will start the factory reset.
4. During factory reset, the LED will turn solid green for about 1s, then the blue and red LED will start blinking in Mode 3 for approx. 2s.
5. The blue LED will be blinking in Mode 1 if the Factory reset is successful.
6.3.4 Remote factory reset with parameter with the gateway
Factory reset can be done remotely with the settings in Parameter No. 120.
Opiniones
30 otros productos de la misma categoría:
-
Bypass para...
-
Qubino...
-
Qubino...
-
Philio...
-
AEOTEC -...
-
AEOTEC -...
-
AEOTEC -...
-
Aeotec Nano...
-
Aeotec Nano...
-
Qubino Mini...
-

WiDom Smart...
-
WiDom Smart...
-
WiDom Smart...
-
Qubino...
-
Fibaro...
-
Fibaro...
-
FIBARO RGBW...
-

FIBARO...
-
HELTUN -...
-
HELTUN -...
-
Heatit ZM...
-
Philio...
-
Philio...
-

Philio...
-
Controlador...
-
Heatit ZM...
-
Heatit ZM...
-
Shelly...
-
Shelly...
-
Shelly...