Ningún producto
Precios con IVA incluído
Producto añadido correctamente a su carrito de la compra
Hay 0 artículos en su carrito. Hay 1 artículo en su cesta.


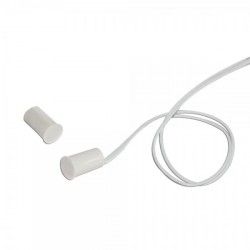
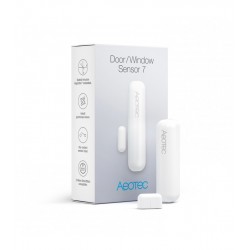
Aeotec Recessed Door Sensor 7 - Sensor puerta empotrado Z-Wave
AEOEZW187
Nuevo
La automatización invisible es la automatización perfecta. El sensor de puerta empotrado de Aeotec version 7 se instala en el marco de la puerta o embutido en la propia puerta y es completamente invisible.
En Stock - Envío inmediato
- Eliminar de mis favoritos
- Agregar este producto a mis favoritos
- Imprimir

Características técnicas
| Tecnología | Z-Wave Serie 700 |
Descripción
Sensor de puerta empotrado Aeotec Recessed Door Sensor 7 - Z-Wave+ Serie 700
Realmente inteligente. Realmente invisible. Con menos de 1 cm de ancho, algunos podrían llamarlo compacto. Nosotros preferimos llamarlo invisible. Es un sensor de puerta que está diseñado de la forma en que los sensores de puerta deberían ser siempre: potentes pero invisibles. Se instala en el marco de una puerta y supervisa el uso de la misma, lo que permite la supervisión de la seguridad y potencia la automatización inteligente.
Instalación invisible
La belleza de la instalación invisible se complementa con la belleza de la instalación sencilla. La instalación del sensor de puerta empotrada 7 es fácil. Y emparejarlo con un sistema de automatización no requiere más que activar su batería y escanear su código QR. Hacerlo invisible significa poco más que un taladro oculto en el marco de la puerta. Es el tipo de instalación que no lleva más de 10 minutos pero que proporciona años de inteligencia y automatización.
Perfectamente mejorado
Incorpora la tecnología Gen7
Los sensores de seguridad deben ser seguros. Los sensores de automatización deben ser avanzados. El sensor de puerta empotrada 7 funciona con la tecnología Gen7 de Aeotec e incluye Z-Wave Plus V2, seguridad inalámbrica S2 e instalación SmartStart.
2 años de duración de la batería
Con su nueva tecnología, el Sensor de puerta empotrada 7 dura ahora el doble que los modelos anteriores: hasta 2 años. Y una vez que se ha ido, cambiar la batería es tan sencillo como retirar el sensor de puerta empotrado 7 del marco de la puerta, cambiar la batería y volver a colocar el sensor en la puerta.
Lo mejor de la tecnología inalámbrica
Los sensores de seguridad deben ser fiables. El sensor de puerta empotrada 7 es. Utilizando la serie 700 de Z-Wave, su alcance inalámbrico permite que el sensor de puerta empotrada 7 se comunique con otros dispositivos Z-Wave hasta 150 metros de distancia.
FUNCIONES:
Sensor de apertura de puertas Z-Wave+ V2
Instalación directamente en el marco de la puerta
No altera la estética de la habitación en la que se instala
Hasta 2 años de duración de la batería
Incorpora las tecnologías Z-Wave Smart Start y S2 Security
Tecnología inalámbrica Z-Wave Plus 700
ESPECIFICACIONES TÉCNICAS:
Alimentación: batería de litio CR2 de 3 voltios y 800mAh
Duración de la batería: 2 años de autonomía (cuando hay <20 informes de apertura/cierre y 4 informes de despertar al día)
Frecuencia de radio: 868,42 MHz
Distancia de funcionamiento: hasta 150 metros en exteriores, 40 metros en interiores
Humedad de funcionamiento: del 8 al 80%.
Temperatura de funcionamiento: de 0°C a 40°C
Distancia máxima al imán: 1 cm
Dimensiones:
Sensor: 19,2 x 64 mm
Imán: 22 x 13 mm
Peso: 30 g
Información Ampliada Z-Wave (Inglés)
Descargue el manual desde aquí.
1. Make sure the product is powered.
2. Press and hold the Action Button for at least 20s, and release when LED becomes solid red color, then Factory Reset is performed.
3. Wait for the LED indicator to be slow fade-in fade-out red LED color, which indicates the reset operation is successful. Otherwise, please try again. Contact us for further support if needed.
Note:
1. This procedure should only be used when the primary controller is missing or inoperable.
2. Factory Reset will:
(a) Remove the product from Z-Wave network;
(b) Delete the Association setting;
(c) Restore the configuration settings to the default.
2. Make sure the product is powered.
3. Single-click the Action Button; its red LED will flash for a few seconds.
4. Confirm the removing result. Successful removing can be confirmed by your controller’s message or the LED status. If the removing is successful, LED will change to the default unpaired state which is slow fade-in fade-out red color. If its LED extinguish without slow fade-in fade-out red color, it indicates the removing is unsuccessful. Repeat the above steps or contact us for further support if needed.
2. Squeeze the sides of the sensor casing to alleviate pressure on the chipboard; slide the chipboard out.
3. Remove the Pull Tab to engage the pre-installed battery. The sensor’s LED will fade the color red in and out for a few seconds to indicate that it’s powered on.
4. To add the product to your automation network manually:
(a) Set your main controller into its 'add product' mode. Refer to its manual if you are unsure of how to perform.
(b) Single-click the Action Button; its red LED will flash for a few seconds.
(c) If your controller supports S2 security, and you want to add the product into S2 Authenticated network, please scan the QR code or enter the PIN code (the underlined 5-digits of the DSK) when prompted. [IMPORTANT] QR/PIN can be found at the bottom of the product. A full DSK string can be found when you open the packaging on the Aeotec Logo Side. Please cut it out of the packaging and write some memo on its backside. Keep it in a safe place.
(d) Wait for the adding process to end.
(e) Confirm the adding result. Successful adding can be confirmed by your controller’s message or the LED status. If adding is successful, LED will become solid red color for 10 minutes and then off, or goes into sleep immediately if receiving the Wake Up No More Information from the controller. If its LED goes back to slow fade-in fade-out red color for 10 seconds, it indicates adding is unsuccessful. The product will auto-reset and then activate SmartStart. Repeat the above steps or contact us for further support if needed.
6. Squeeze the sides of the sensor casing lightly again and re-insert the chipboard as it was. Re-attach the lid.
7. Recessed Door Sensor 7 is now a part of your Z-Wave home control system. You can configure it and its automations via your Z-Wave system; please refer to your software's user guide for precise instructions.
2. Press and hold the Action Button for at least 2s and release when the LED becomes slow pulsing red color, then Wake Up Notification is issued.
3. Wake Up destination is according to the Wake Up Interval Set. It will stay awake for 10 minutes after issuing Wake Up Notification, that is called 10-Minutes Awake Mode, however it will go into sleep immediately if receives Wake Up No More Information by the Wake Up destination. If you want to exit the 10-Minutes Awake Mode manually, please single-click the Action Button, then it will go into sleep immediately and its LED will extinguish.
Note:
There is another way to manually trigger Wake Up, that is repower on, but it’s not recommended for inconvenience. The Wake Up destination is according to the Wake Up Interval Set. The Wake Up period starts when the node issues a Wake Up Notification and it ends either 10 seconds after the last received/transmitted frame or at the reception of a Wake Up No More Information Command by the Wake Up destination.