No products
Prices are tax included
Product successfully added to your shopping cart
There are 0 items in your cart. There is 1 item in your cart.


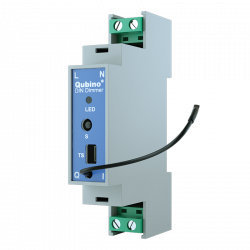
Qubino Flush 1 Relay
ZMNHAD1
New
1 relay micromodule with Qubino Flush 1 Relay consumption control for on / off, with Z-Wave Plus technology. It is a relay used to turn on / off (On / Off - all / nothing) electrical devices such as lights, fans, ovens, washing machines, irons, power outlets, garage doors, electric radiators, water heaters, etc. ..
In Stock
- Remove this product from my favorite's list.
- Add this product to my list of favorites.

Technical characteristics
| Technology | Z-Wave Plus |
| Characteristic | Consumption Measurement |
More info
The smallest Z-Wave relay in the world
The Qubino Flush 1 Relay is ideal as an electric switch for lights, fans, ovens, washing machines, irons, sockets, garage doors, electric radiators, water heaters, etc. You can control it remotely through the Z-Wave network or through wall switches. It also measures the power consumption and supports the connection of a digital temperature sensor.
The smallest Z-Wave relay
The Z-Wave relay Qubino Flush 1 Relay is a micromodule that occupies less space than any other module with which it is compared to any other competitor and will fit easily into any conventional mechanism box.

This Z-Wave micromodule Qubino Flush 1 Relay is a relay used to turn on / off (On / Off - all / nothing) electrical devices such as lights, fans, ovens, washing machines, irons, power outlets, garage doors, electric radiators , water heaters, etc ...
This hidden relay micromodule, Qubino Flush 1 Relay has an input to connect a temperature probe , which suits it to control heating or air conditioning systems.
What can be used for?
The Qubino Flush 1 Relay is ideal for remote control and change of electrical devices (eg lights or fans).
Energy control
The simple relay Z-Wave Qubino Flush 1 Relay , makes measurement of electrical consumption of the connected electrical device and of itself, when it is in "standby" it only consumes 0.4 W.
Very versatile
The Qubino Flush 1 Relay , can operate through an extensive range of temperatures from cold -10ÚC to suffocating 40ÚC (14Ú 104ÚF). It supports the connection of a digital temperature sensor, which is also useful for creating complex scenarios. Each module also acts as a repeater in order to improve the range and stability of the Z-Wave network.
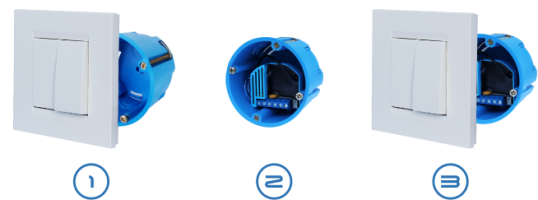
The simplest installation.
The extremely small size and a specially designed housing mean that the connection of the module inside a recessed mounting box is simple. The installation process, tested and approved by professional electricians , consists of only three simple steps:
1 - Remove the switches from the box and disconnect the cables.
2 - Connect the cables to the Qubino module and insert them into the box.
3 - Fix the switches to the box.
The most proven and reliable Z-Wave modules
Qubino's Z-Wave modules are install-and-forget products. The Qubino products that we offer, are manufactured to last, so they only use electronic components that meet the most demanding levels of quality. Our modules are also the most tested Z-Wave micromodules on the market. The Slovenian Institute of Quality and Measurement (SIQ), an independent European entity, checks the quality of the actual parameters of our products, including temperature increases, manufacturing, insulation resistance, electrical consumption and overloads according to European standards of the highest quality according to the specification of standard EN 60669-2-1.
Additional parameters for professionals.
The Qubino Flush 1 Relay micromodule It has 15 additional parameters for its use by experts. Some of the most useful are
- Adjustment of the mono-stable type (pulsator) or bi-stable
- Activate or deactivate the ALL ON / ALL OFF functions
- Automatic on / off output after set time
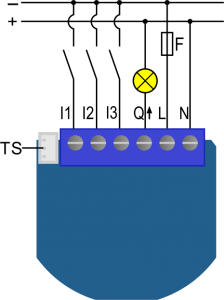
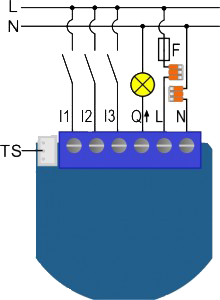
The micromodule can be controlled either through a Z-Wave network or through a wall switch. This module has been designed to be mounted inside a mechanism box and hidden behind a conventional wall switch.
We highlight as an advantage with respect to other regulators, that the Qubino Flush 1 Relay micromodule is able to control the electrical consumption of the connected load (lighting, fan ...). It also has a connector to which you can connect a temperature probe (optional, not included) to provide greater versatility to this module, which apart from the lighting control, offers control of electricity consumption and temperature information of the stay in the one that has been installed.
Electrical diagrams and technical specifications:
We emphasize that Qubino offers us strict quality, safety and durability standards in the manufacture of its hidden micromodules. It should be noted the selection of high quality components and high performance, such as the use of internal components of the Omron brand.
| Feeding: | 110 230 VAC ± 10% 50/60 Hz, (24 30 VDC) |
| Maximum AC output load (resistive load) * | 1 X 10 A / 230 VAC |
| Maximum DC output load (resistive load) * | 1 X 10 A / 30 VDC |
| Output circuit power of AC output (resistive load): | 2300 W (230 VAC) |
| Output circuit power of DC output (resistive load): | 240 W (24 VDC) |
| Accuracy of the power measurement: | P = 5 50 W, +/- 3 W P> 50 W, +/- 3% |
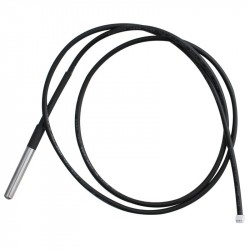
| Digital temperature sensor range: | -50 ° ~ + 125 ° C, resolution 0.1 ° C |
| Cable length of the digital temperature sensor: | 1000 mm |
| Operating Temperature: | -10 ° ~ + 40 ° C |
| Distance | up to 30 m indoors (depending on materials) |
| Dimensions (WxHxD) | 41.8 x 36.8 x 15.4 mm |
| (packaging) | (115 x 96 x 22) |
| Weight (including packaging) | 48 g (64 g) |
| Electric consumption on standby | 0.4 W |
| For installation in mechanism boxes | Ø e 60 mm or 2 M |
| Switching by: | Relay |
* In the case of loads other than resistive loads, pay attention to the value of cosÆ and, if necessary, use a load lower than the nominal load. The maximum current for cosÆ = 0.4 is 3 A at 250 VAC, 3 A at 24 VDC L / R = 7 ms.
![]()
Download
Extended Z-Wave info
Manual download HERE.
1. Enable add/remove mode on your Z-Wave gateway (hub)
2. Connect the device to the power supply (with the temperature sensor already connected – sold separately*).
3. Auto-inclusion will be initiated within 5 seconds of connection to the power supply and the device will automatically enrol in your network
MANUALLY ADDING THE DEVICE TO A Z-WAVE NETWORK (MANUAL INCLUSION)
1. Enable add/remove mode on your Z-Wave gateway (hub)
2. Connect the device to the power supply (with the temperature sensor already connected*)
3. Toggle the switch connected to the I1 terminal 3 times within 5 seconds
OR
If the device is powered by 24 V SELV supply, press and hold the S (Service) button between 2 and 6 seconds
4. A new multi-channel device will appear on your dashboard
*If connecting the temperature sensor, switch off the power supply and make sure the device is excluded from your network BEFORE connecting the sensor.
*Make sure the device is excluded from your network before connecting the temperature sensor. Switch off the power supply, connect the temperature sensor, and re-include the device to your network.
1. Connect the device to the power supply
2. Make sure the device is within direct range of your Z-Wave gateway (hub) or use a hand-held Z-Wave remote to perform exclusion
3. Enable add/remove mode on your Z-Wave gateway (hub)
4. Toggle the switch connected to the I1 terminal 3 times within 5 seconds
OR
If the device is powered by 24 V SELV supply, press and hold the S (Service) button between 2 and 6 seconds
5. The device will be removed from your network but any custom configuration parameters will not be erased
1. Connect the device to the power supply
2. Within the first minute (60 seconds) the device is connected to the power supply, toggle the switch connected to the I1 terminal 5 times within 5 seconds (5 times change switch state)
OR
If the device is powered by 24 V SELV supply, press and hold the S (Service) button for more than 6 seconds
*By resetting the device, all custom parameters previously set on the device will return to their default values, and the owner ID will be deleted. Use this reset procedure only when the main gateway (hub) is missing or otherwise inoperable.